ForeUI is an easy-to-use UI prototyping tool, designed to create mockup / wireframe / prototypes for any application or website you have in mind.

ForeUI Blog

ForeUI V4.0: New Collapsable Tools Panel

If you are familiar with ForeUI, you will notice the tools panel is completely different once you open ForeUI V4.0. The picture below shows the differences.

new_tools_panel


We have to admit the old tools panel is more compact and can place more buttons within the same area. However, the new tool panel is better organized and allows you to collapse the categories that you are not frequently used.

collapse_category

ForeUI will remember the collapse state of the category, and will not expand it until you manually do so.  Depends on how you use ForeUI, you will have different preferences to show/hide certain categories.

The “Current Selection” category might be the most commonly used category, it is refactored in V4.0 and become more easy to use. Here you can see the number of elements that are currently selected, all their ids, who is the leading element etc. You can also rename the leading element here. By clicking the element id you can set it as the leading one. By clicking the small cross button you can remove the element from selection. The animation below shows the details.

change_selection

If you select a container element (Group, Window, Table, Tree, Tabs, Scrollable Container etc.), you will see another bar below the leading element id. Here you can choose the embedded element within the container by clicking the small right arrow beside the container name. Clicking on the embedded element can choose its sibling element (if any).

select_embed

We wish you like the new tools panel. If you have any question, please feel free to contact us 🙂


ForeUI V4.0 beta is out!

Dear ForeUI users, it has been a while since ForeUI’s last update, and today we finally bring you the good news: V4.0 beta is available now!

Screen Shot 2015-07-21 at 1.10.32 PM

Why BETA First?

Why beta version instead of an official release? Has this version get tested before releasing? The answer is YES, we already went through 15 iterations in alpha phase, and we are sure this beta version is usable (and much better than older versions).

The real reason that we have it as beta, is this version contains a lot of new features and enhancements, and we don’t have time to update the documents for them. Since today, we start to blog about the new features and enhancements in V4.0, and these content will also be updated to ForeUI’s documents. We are expecting to have the documents all up to date in about a month, and fix some bugs if we found any, then we release the V4.0 official version.

How to Upgrade?

If you run the older version of ForeUI, you will get the notification about the new version. However you will not be able to upgrade directly in the software, instead you will have to download the new version here, then install it.

Since this version, ForeUI supports Java 7 and higher. If you are using Mac OS X, the system will not complaint about the requirement of legacy Java run-time anymore.  If you download the installer for Windows, it contains the latest Java 8 run-time (both 32bit and 64bit) in package and will install the suitable one in your system.

If you already have a license key that younger than one year (purchased after 2014.7.21), you can use that license key directly on this version. Otherwise you can use the public beta tester license key below for testing (it will be expired in about a month):

NWE3NDI3OGM4MDU4M2RlMTdkZDQzMzdlOWNjM2NmYTRRBE1pNTRxEE1UUTBNREl3TWpNek53PT1g
GFZqUXVNQ0JDUlZSQklGUmxjM1JsY25NPWEITWpBd01BPT1QCFJtOXlaVlZKcBBNVFF6TnpRM05E
WTFNUT09YmY0YmEwZTBjZmJiODAwOGRiYzM3ZWE2NWVmMTQ0MjY=

Should I Use This Version?

If you are new to ForeUI, we encourage you to use this new version. Comparing to the older versions, it is much more powerful and can do better work in the major of cases.

If you know ForeUI well, and you are about to start a new project, we encourage you to use this new version. You will feel comfortable to work with it and find the new features and enhancements very helpful.

If you are working on a old project with ForeUI, we suggest you not to use this new version to work on it. Although we worked hard on the compatibility, there are still some angles that we have not considered. If you really want to try it, please make sure to backup your plot file (ForeUI will actually do it for you, when you load the old plot in new version). In the worse case, if your are unhappy with the new version, your work on the new version can not be ported back to the older version (means you lose the work on new version, if you still keep the plot backup).

Please notice that, since this version, ForeUI uses a newer format to store the plot data. For this reason, the plot file created with new version could not be loaded by the older versions. However, plot files created with older versions could be loaded by the newer version.
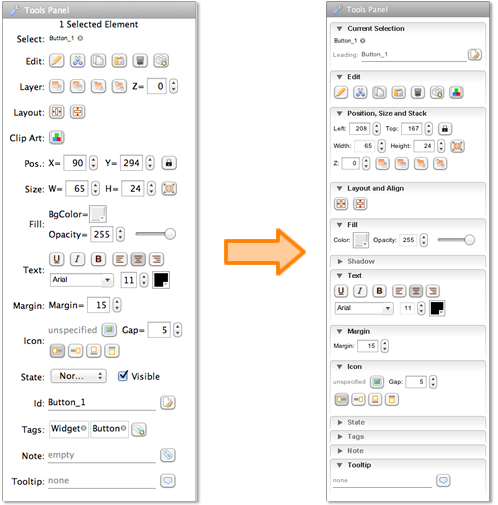
What’s New?

There are many new features and enhancements in this version. You can find a full list of them here: http://www.foreui.com/history/

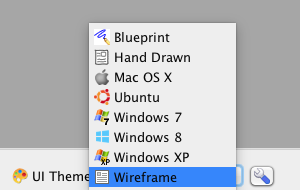
The most obvious new feature is the two new UI themes: “Windows 8” and “Ubuntu”. The “Blueprint” UI theme has been added to the default UI theme list too. So now there is 8 UI themes available by default.

Screen Shot 2015-07-21 at 11.49.22 AM

In the coming few days, we will continue blogging about the new features in V4.0. Considering the leak of document of the new version, those blog posts may be the best materials to cover these new features and enhancements. So please stay tuned 🙂


ForeUI is in the “Best Tools for Making Wireframes” List from DesignContest

DesignContest recently published their “Best Tools for Making Wireframes” list in their blog, and we are proud to find out that ForeUI is in the list 😀

ForeUI_DC

Although we think ForeUI is much, much more than a wireframing tool, we are still happy to see ForeUI get listed in this list.

About DesignContest

Design Contest is a community shaped by the joint efforts of talented designers and contest holders, helping decent clients and good designers to find each other. The info-graphic below is compiled by DesignContest to represent the scope of the graphic design industry. The landscape is divided into 5 branches, and includes some of the most outstanding options to choose. The objective of this info-graphic is to help you find the right company or method to create your designs, as well as to see the competition.

graphic_design_industry_landscape

ForeUI V3.90: Mark Element “Clickable” and Change Tooltip Dynamically

ForeUI V3.90 is released today! Besides the potential minor update (SP) versions on it, this version will be the last one before V4.0 (V4.0 will be released on early 2015).

Easily Mark Element “Clickable”

If you have ever used ForeUI to create a custom button, there is a big chance that you have ever handled “Mouse Over” and “Mouse Out” events and set the system cursor accordingly. If you are making a website prototype, you may want to make a lot of “clickable” areas on the page, handling those two mouse events on so many elements are really time consuming, and it makes the behavior list looks more complex.

Since V3.90, a new, simple option appears in the tools panel and allows you to mark element “clickable”. This option is available for almost all elements, except Button, Radio Button, CheckBox, Hyperlink and ComboBox, which are always clickable in simulation. Once an element is marked as “clickable”, it will change the shape of cursor that is hovering on it in the HTML5 simulation, thus acts like a clickable object on the page.

MarkClickable

Change Tooltip Dynamically

Tooltip is often used to prompt user about the functionality of button or other objects on the UI. If you just need a static tooltip, it could be specified in the “Tooltip” field in tools panel. But sometimes you may want to have a dynamic tooltip, which will change according to the context. This becomes possible since V3.90. A new “Set Tooltip” action is available in “Manipulate Elements…” window for all elements.

SetTooltip

The tooltip here can contain properties as well, so it is really a dynamic one. Setting an empty tooltip will remove tooltip from the element.

“Page Unloaded” Event

Almost everyone has used the “Page Loaded” event, which will be triggered when the target page is about to show. That is very useful when you want to initialize something before the page is shown. Now we have the “Page Unloaded” event, which will be triggered when you are about to leave the page. The handler for “Page Unloaded” event is the perfect place to clean up something before leaving.

PageUnloadedEvent

Collapse Behavior Tree Item

Now you can collapse behavior tree item. If you have a big branch in the behavior tree and you are not checking on it, collapsing it can save a lot of room and you can focus on the part you are reviewing.

collapsableTreeItem

Other Changes

You can find the complete list of changes made in this update here.


ForeUI V3.8: Use ClipArt to Make HTML5 Simulation Smaller and Faster

ForeUI V3.80 is released today.  This version introduces a new approach to optimize your HTML5 simulation, which is extremely useful for people who want to create big, complex prototype with ForeUI.

After actively working on a plot for some time, you may find out that your plot becomes bigger and bigger. Loading and saving the plot file is slow, and it may take several minutes to launch the simulation in web browser. When this happens, we would suggest you to optimize your plot before adding more content into it. Actually, the best practice is to understand how to avoid unnecessarily increase your plot size, and keep your plot small and neat at the beginning. We have a document to introduce all currently known tricks for this topic.

Before version 3.8, those tricks focus on avoiding duplicated or useless content in your plot. Since this new version, we have a new approach, which is to reduce the number of DOM objects that need to be loaded by the web browser, hence directly make your HTML5 simulation smaller and faster. Consider such an example: on the page you have a chart created with basic shape elements, such as rectangle, arrow line, text box etc., and you have two buttons to navigate between pages. Actually only these two buttons have their behavior defined, and other elements are just shapes or text, which are completely static. If you use older version of ForeUI to generate HTML5 simulation for it, all those elements will be converted to DOM objects, which have to be loaded by the web browser. If your plot has a lot of shape elements which are actually static during the simulation, loading them as DOM objects is a waste of resource for web browser, and you will see the simulation loading time meaninglessly prolonged.ChartNavI guess you already know what I am going to say, the best way to treat those “static” element is to put them into an image and let them display as a static background, while those buttons that have behavior defined should be kept as they are. So to simulate the page mentioned above, the web browser just need to load 3 DOM objects: the static chart image and two buttons, which will be very fast! Now the question is: how to tell ForeUI to do so?

ClipArt Element

The answer is to use ClipArt element, which is newly included in ForeUI V3.80. This new ClipArt element is not an element that you can directly drag and add into your plot. You will need to select one or more elements and then click the convert_clipart button in the tools panel to wrap it/them as a ClipArt. ClipArt is just like a Group, but it will be output as a static picture in the HTML5 simulation, which means all its members will not be interactive during the simulation. So please make sure not to abuse it, and do not put any element that has (or will have) behavior defined into the ClipArt, otherwise ForeUI will warn you in the behavior editor:

ClipArtError

Wrapping some elements into a ClipArt looks like to put a static picture into your page, but there is difference: you can not modify the content of static picture in ForeUI, but you can edit the members of ClipArt as you wish. What’s more, you can always restore those elements from the ClipArt. This is extremely useful when you need to modify the diagram frequently.

You maybe interested in how good this kind of optimization can be, let’s see some comparisons.

The two plots in the comparison have the same content and behavior, the only difference is the second one converts all static elements into ClipArt elements. The plot files and HTML5 simulations are available in the table, so you can do the test by yourself. Your result may vary a little bit, depends on the hardware and software environment, but you will see the similar result, that the plot use ClipArt can be loaded much faster.

If you have a big plot, try using the methods mentioned in this document to optimize its size. If you are just starting a new plot, please also learn those tricks and keep your plot small. If you just want to create a prototype with less than 20 pages, it should be fine to ignore all these optimizations. However, if you are targeting a prototype with 100+ pages and still want it to be small and fast (it is possible, we have saw people did it), those optimizations are almost mandatory.