ForeUI is an easy-to-use UI prototyping tool, designed to create mockup / wireframe / prototypes for any application or website you have in mind.

All posts by ForeUI

ForeUI V4.0: Dynamically Manipulate Elements

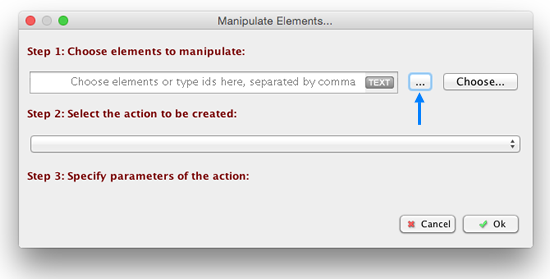
ForeUI V4.0 implements a very useful enhancement on manipulating elements. If you choose “Manipulate Elements…” from the “Add Action” menu, you will see this window:

insert_prop_as_target

Since version 4.0, you can find the small “…” button beside the targets’ id input field. That means you can use properties to specify target elements dynamically. Because the target elements are not confirmed at the editing phase, only some common actions are available in this case, such as moving, resizing and show/hide elements.

Example: Move Up Selected Element

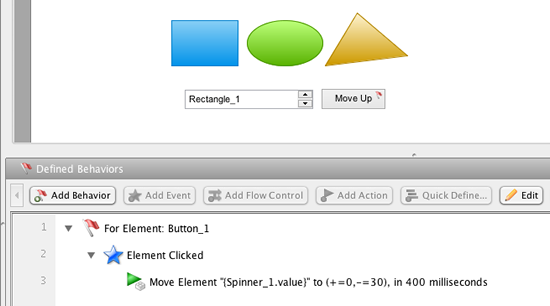
In this simple example you will see how to dynamically manipulate elements in ForeUI HTML5 simulation. Put three elements into your plot and put their ids into a Spinner element, then you place a button aside and define its behavior as shown below:

dynamic_manipulate_edit

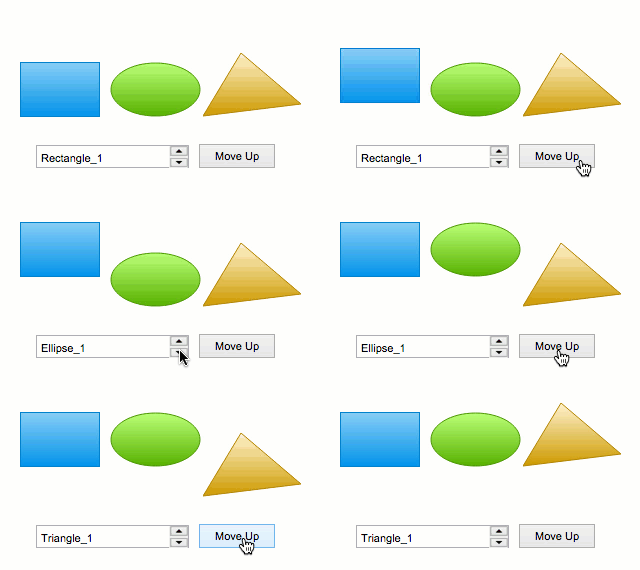
As you can see, the behavior is very simple, and it even doesn’t mention any element that it will move. Once the button gets clicked, it will move an element up, whose id equals to the current value of the Spinner element. How the HTML5 simulation will look like? Please see the animation below:

dynamic_manipulate_simulation

The target element is decided in the run-time, and the user/reviewer has the chance to specify the target element. If you replace the Spinner element with TextEditBox element, you can choose any element on the page to move.

Conclusion

This enhancement looks very small, but it is very useful and makes ForeUI simulation more powerful. If you have ever used ForeUI before, you know how difficult it will be to implement such a scenario in older versions of ForeUI, basically you will have to predict all possible target elements and make a branch of behavior for each of them. Now with this small enhancement, things become so easy and you just need to define one line of behavior for all of them.

ForeUI V4.0 is Released!

Dear ForeUI users, I am so happy to announce that ForeUI V4.0 is released now!

It has been almost three months since we released V4.0 beta. During the recent three months we received a lot of feedback from ForeUI users, and we worked on the documentation and bug fixings. The final V4.0 of course contains all the features in beta version, and we have blogged some of them before:

We will continue writing blog posts to introduce the new features in V4.0. Meanwhile this final V4.0 also has some bug fixed and includes some important enhancements and performance optimizations, and you can find a full list of changes here.

Outline View: Selecting Elements

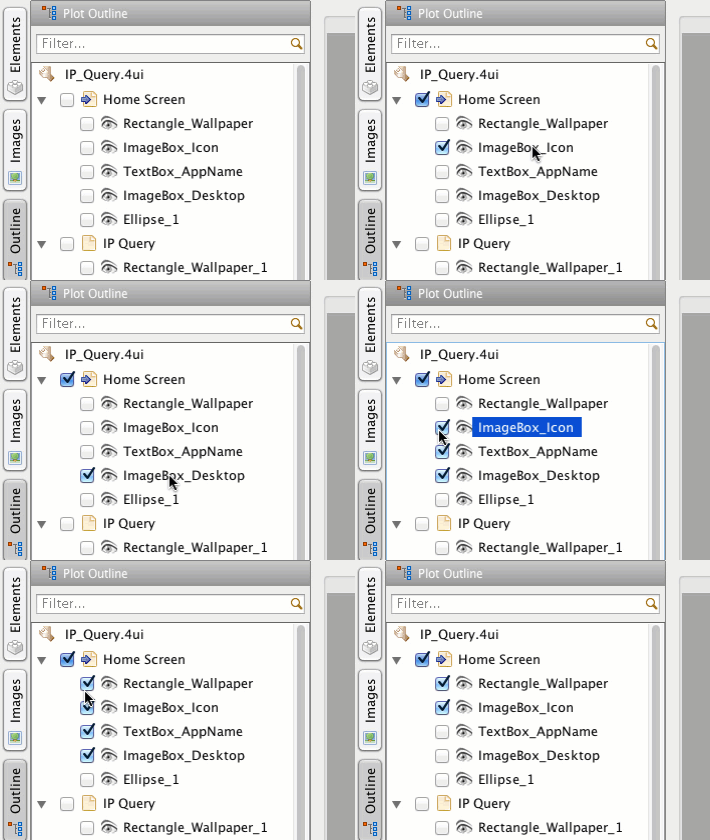
In this version, we made a very useful enhancement, which eases the batch selection in outline view. Now clicking on element’s id label has different effect than clicking on the check-box on its left. If you click on element’s id, ForeUI assumes that you want to select this element only, and will clear the previous selection. If you click on the check-box, ForeUI assumes that you want to add/remove the element into/from the current selection, and other elements in the selection will be kept.

outline_selection

Behavior Editor: Disable Expression Diagnose

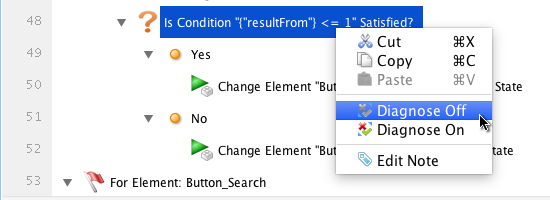
This small enhancement is reserved for advanced users. ForeUI diagnoses the expressions in the background, this is a very handy functionality. If the diagnose engine thinks an expression contains error, that line of behavior (and its descendants) will be excluded from the HTML5 simulation. This avoids a lot of chances to ruin to simulation with typo. However, what if the diagnose engine misjudges (because of bug or limitation)? This new option allows you to temporarily disable the diagnose engine for specific row of behavior, and make sure that behavior will be included in HTML5 simulation.

disable_diagnosePlease notice that, once you disable the diagnose, you are the only one who can make sure the expression gets right. If it is not, it could halt your HTM5 simulation. So this option is reserved for advanced users, and please try not to use it, or at least use it wisely, if you know what you are doing.

How to Install the New Version?

If you haven’t installed V4.0 beta before, you need to download the new installer here, and then install it, since the in-app update can not work for this major upgrade.

For users who has installed V4.0 beta before, it is possible to upgrade to V4.0 with the in-app update. However, downloading new installer and install again doesn’t hurt anything.

If you want to keep the older version, you can choose a different directory during the installation, otherwise the new version will overwrite the older version.

ForeUI V4.0: Translate/Customize Text in ForeUI

ForeUI V4.0 brings a lot of new features, one of the most interesting new feature is that you can localize ForeUI by yourself, which means you can translate the text you see in ForeUI into the language you want.

Why we make it?

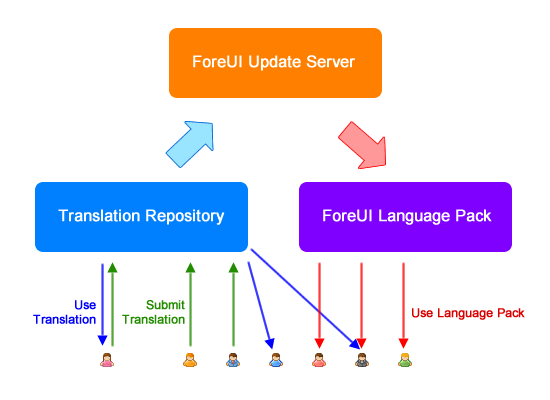
Previously we include language packs translated by volunteers, which works well. However, the translations need to be updated according to software update, and we have more languages to support. We want to build a platform for it, so everyone can very easily contribute his/her translation.

How it works?

Translating all texts will be a lot of workload, but you don’t have to translate all of them. Sentence or phrase is the minimum unit for translation. You can translate just one sentence or phrase and submit it. Once you do that, your translation will be automatically applied on your ForeUI, and you can enjoy your work immediately.

foreui_connect

All translations will be public shared. When you try to translate a sentence or phrase, you may see that someone already did it before, and you can use his work instead of translating by yourself. Your translation may also be used by others, the more users choose your translation, the more credit points you will get, and those credit points can be used to get discount on buying/renewing ForeUI license in the future.

We will put those translations that are widely used into language pack and push it to all users during software upgrade.

How to use it?

You may already notice the new tab foreui_connect_tab on the right side of ForeUI’s main window, and the view has title “ForeUI Connect”, which is the entrance of this feature. ForeUI Connect is a platform for online activity, and translating ForeUI is just the first feature we implement on it.

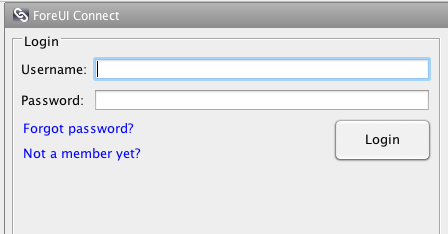
You will need to login before using this feature. The login account/password is the same you used to login our website. If you don’t have an account yet, you can register one here, or click the “Not a member yet?” link in the view.

foreui_connect_login

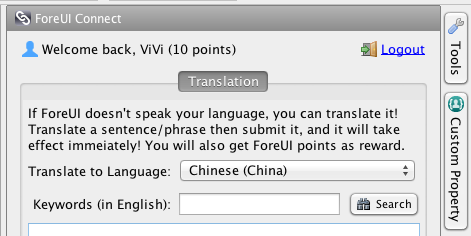
After login you will see the “Translation” tab inside the view, and you are ready to go:

Screen Shot 2015-09-05 at 11.07.12 AM

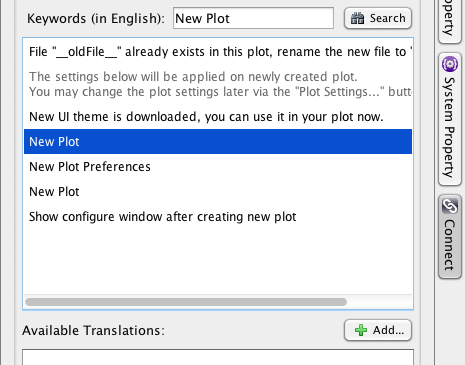
Here you need to specify which language do you want to translation ForeUI to. Then you can input a keyword in English to find the text to translate. Below is an example, I input “New Plot” as the keyword and then click “Search” button, and 7 results a listed:

Screen Shot 2015-09-05 at 11.22.25 AM

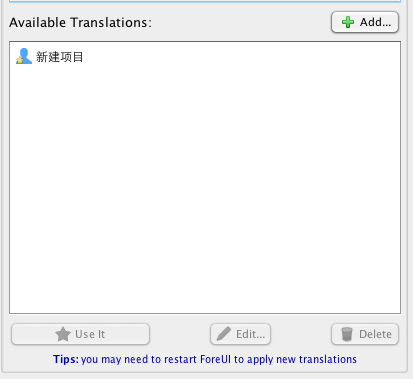
There are two “New Plot” phrases in the list, because we have two places in ForeUI that use this phrase (one is for menu/toolbar/welcome page,  and the other is for the settings window). Now you can choose the phrase to translate. If someone else (or you) has ever submitted a translation for this phrase, you will see it in the “Available Translations:” list. As shown below:

Screen Shot 2015-09-05 at 1.35.44 PM

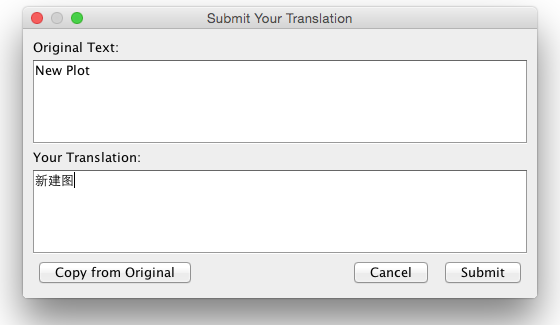
If you like this translation, you can select it and the click the “Use It” button. The more users use a translation, the higher chance that it will get included in future language pack. If the translation was submitted by you, you can also edit or delete it here. If you don’t find any existing translation can satisfy you, you can submit your own by clicking the “Add…” button above the list. A window will pop-up and accept your new translation.

Screen Shot 2015-09-05 at 1.41.39 PM

After clicking the “Submit” button, congratulations! You just contributed one translation to the repository! Meanwhile you will be able to switch to the language that you are translating ForeUI to, and see the translated text in ForeUI immediately.

We hope you like this new feature, and wish more users to contribute their translations 🙂

ForeUI V4.0: Adding Files into Your Plot

Since V4.0, ForeUI allows you to add any file into your plot, such as video, PDF document, and ZIP archive etc.. Once you add the file into your plot, it will be stored in your .4ui file and get extracted to output directory, when you export your plot to HTML5 simulation.

How to add File?

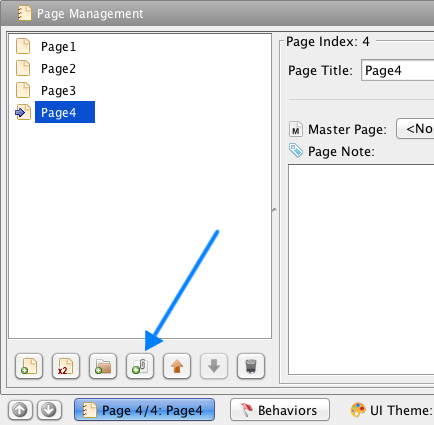
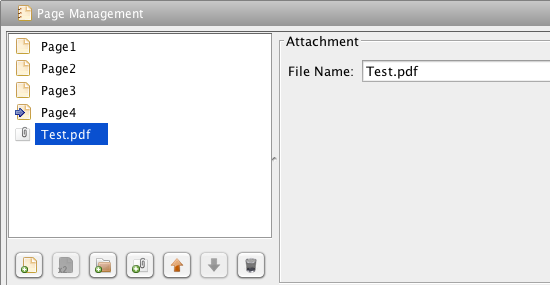
The new “Add Attachment” button in the page management view is added for this purpose. Once you click this button, you will be asked to choose the file to add. Any type of file can be added, and there is no limitation on the files number. However, please keep in mind the files will be saved into your plot file (.4ui file). If you put too many files, or too big file into your plot, your .4ui file might become much bigger.

add_attachement

After you add the file into your plot, you can still change its file name. The file name must be unique in the plot, since all attached files will be exported to the same directory.

Screen Shot 2015-08-08 at 9.47.27 AM

How to Access the Attached File in HTML5 Simulation?

Once you run HTML5 simulation, or export your plot to HTML5 simulation, all attached files will be extracted to the “files” folder under the simulation directory. So it is possible to access them via relative URLs in the simulation.

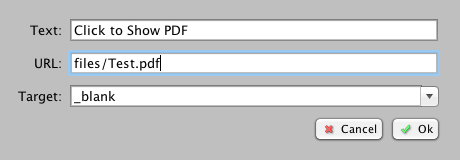
If you want to make a hyperlink to the attached file. You can use the Hyperlink element and specify its URL to “files/<file_name>”. Please see the example below:

Screen Shot 2015-08-08 at 10.27.43 AM

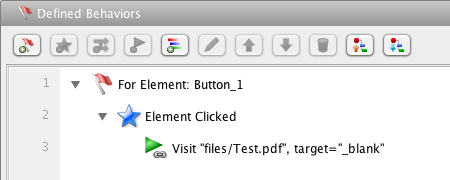
Or if you want to use Button element, it is possible to link an attached file to the button with “Go to URL” action. You just need to set its URL to “files/<file_name>”:

Screen Shot 2015-08-08 at 10.31.04 AM

Of course you can link the file to any other elements with the same approach.

Attach Javascript Library File

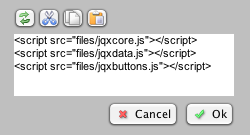
Thanks to this new feature, now you can easily add Javascript library file as attachment, and then use Html element to import it into your HTML5 simulation. Below is an example for Html element that add jQWidgets library files into HTML5 simulation, all these Javascript files are attached into the plot beforehand:

Screen Shot 2015-08-08 at 10.51.48 AM

Conclusion

This new feature is very useful, as it allows you to add any type of file into your plot (and HTML5 simulation).

With this feature, you can let people to download video or document from your HTML5 simulation, without manually modifying anything in the code.

You can even use this feature to add new Javascript library into your HTML5 simulation, so you can use the feature provided by other Javascript libraries.

ForeUI V4.0: Expression Usage

If you are just using ForeUI to create a GUI mockup, you could just ignore the usage of expression. By using correct events and actions, you can make some interactive HTML5 simulations without using any expression. However, if you want to define more complex behavior for your prototype, you will have to use expression, more or less.

What is Expression?

Expression is a snippet of text string in specific format, and could be parsed to Javascript code in HTML5 simulation. In ForeUI, we have system properties, element properties and custom properties, and an expression may contain one or more properties. When you export your plot to HTML5 simulation, the properties in expression will be converted to a Javascript function call, and its value will be return by that Javascript function.

When you define behavior for your prototype, if you see a “…” button next to a text input box, it means that text input box accepts expression, and you can insert property into it. For example, when editing the “Show Message” action, you can click the “…” button to insert a property into the message you are editing.
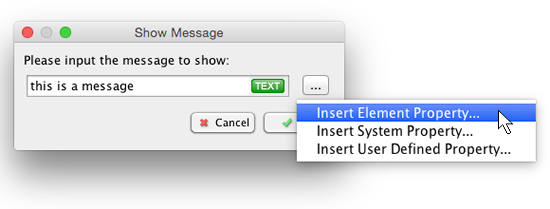
insert_property

A property will look like {“PropertyName”}, and it will be replaced by the actual value during the HTML5 simulation.

Parsing Mode

Since V4.0, ForeUI supports two different parsing modes for expression:

  • TEXT: the entire expression is regarded as a text string. Besides parsing the properties, other parts of the expression will be quoted with double quote marks and connected with plus sign.
    Example: This is the value of a : {a}  => “This is the value of a: “+getProperty(“a”)
  • EVAL: only the properties in the expression will be parsed, and the rest parts of the expression will keep as they were.
    Example: 31-Math.max({“a”},12) => 31-Math.max(getProperty(“a”),12)

So if an expression is in TEXT parsing mode, you could not make any calculation, instead you are just building a text string, with or without property values. While in EVAL mode, you can make calculation, and call Javascript functions in the expression, it is just like coding directly in Javascript, only the properties are written in special format (and they will be replaced by getProperty() function call in the simulation).

In the text input box that accepts expression, you may see  exp_text or exp_eval icon on the right. Clicking on it can toggle the parsing mode between TEXT and EVAL. Sometimes the text input box can only accept one parsing mode, in that case the icon will get gray and you can not toggle the parsing mode.

TEXT mode could be taken as a subset of EVAL mode. You can always write an expression in EVAL mode to replace one in TEXT mode. In the above example for TEXT mode, we can use “This is the value of a: ” + {“a”} in EVAL mode to get the same result in HTML5 simulation. So why do we need the TEXT mode at the first place? Because it is simpler, not that easy to make syntax mistake, and is powerful enough in the major of cases. In TEXT mode, we just write the text you want to display, and use properties in the places you need.

You may already noticed that, properties in TEXT parsing mode don’t have quote marks with their names, while the properties in EVAL parsing mode do. It is because in EVAL mode, when you write something in the expression, ForeUI doesn’t know if it is a string, or something that needs to be evaluated (calculation or function call), so you need to explicitly use quote marks to tell ForeUI “this is a text string”. When you click the TEXT/EVAL icon to toggle the parsing mode, ForeUI will add/remove the quote marks for you.
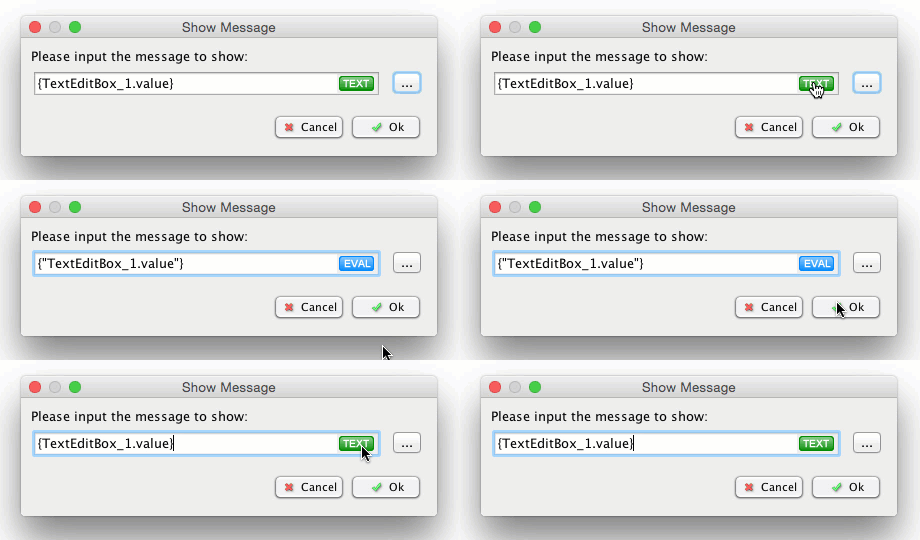
toggle_parsing_mode

If you input a property in EVAL mode and you forgot to add quote marks to its name, the diagnose engine will take it as an error.
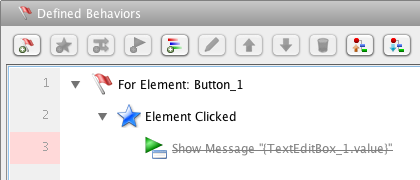
Screen Shot 2015-07-28 at 12.29.07 PM

Although it is not required to add quote marks to property name in TEXT mode, adding them doesn’t break anything (the parser will accept that). So if you are not sure, always add quote marks to property names, and it will be safe.

Preview the Parsing Result

If you have some knowledge of Javascript syntax, previewing the parsing result will help you to make sure what will happen in the simulation. This preview feature is newly added since V4.0, and can show you how the expression will be parsed and what code will be generated in HTML5 simulation. Hovering your mouse cursor over the text input box, and you will see the preview in tooltip.

The parsing preview will take the current parsing mode into account. In the example below, “Math.sqrt(” will not be regarded as text string, because it is in EVAL parsing mode.
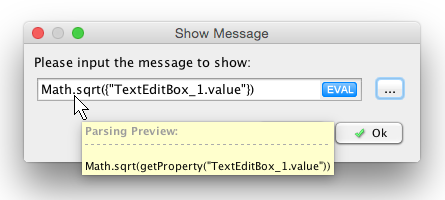
parse_eval

Casting Property to another Type

ForeUI supports 4 kinds of data types: Number, String, Array and Object. When exporting your plot to HTML5 simulation, properties in these data type will be converted to corresponding variable in Javascript.

Since Javascript is weakly typed language, usually you don’t have to cast a variable from one type to another. However, there are still some exceptions. For example, if you want to add two variables together, the type of variable does mater: 1+2 gets 3, while “1”+”2″ gets “12”. In ForeUI, a property equals to a Javascript variable, so the situation will be the same, you may want to cast a property to another type, occasionally. How to do it then?

It is simple, using a capital letter N/S/A/O at the beginning of the property can declare which data type should the property be cast to.

  • N{“a”} means casting property “a” to a number
  • S{“a”} means casting property “a” to a text string
  • A{“a”} means casting property “a” to an array
  • O{“a”} means casting property “a” to an object

Below is an example of using type casting:
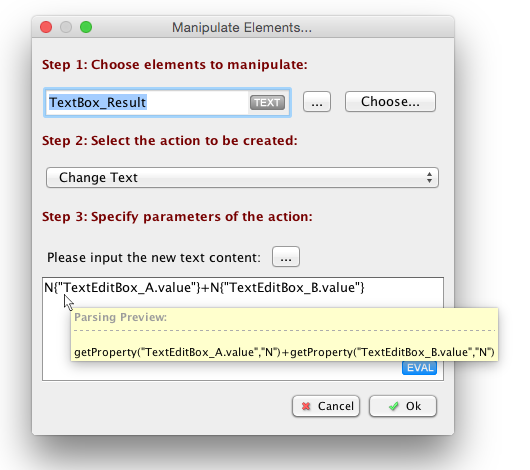
Casting

As you can see in the parsing preview, an “N” parameter is appended in the getProperty() function call, and that will do the type casting.

Conclusion

ForeUI V4.0 enhances the expression a lot by clearly separating two parsing modes, and allows data type casting. By correctly using these new features, you can make calculation and function call in the expression, and define complex logic with just one expression. Do you still remember that? In older versions of ForeUI, you must use some temporary properties to store intermediate variables for the calculation, just because of the lacking of EVAL parsing mode and the data type casting. Now we already have all these in ForeUI, and you can really create something cool with very few effort 🙂