ForeUI is an easy-to-use UI prototyping tool, designed to create mockup / wireframe / prototypes for any application or website you have in mind.

All posts in Update

ForeUI V4.2: Enhanced Menu and System Properties

ForeUI V4.2 is out today. The new version makes some important enhancements, which were strongly requested by our customers.

Disabling Specific Menu Items

Now you can disable one or more menu items. The disabled items will be grayed out and they become unselectable in the HTML5 simulation. This new feature is available on both Menu and Multilevel Menu elements. To disable a menu item, you just need to put a “#” at the beginning of its text. The example below disable the “Save” and “Word Document” items:

DisableMenuItem

When you run the HTML5 simulation, these two items are not selectable any more.

DisableMenuItem

If you really need to display a “#” character at the beginning of the menu item, you can still use a “\” to escape it.

New/Enhanced System Property

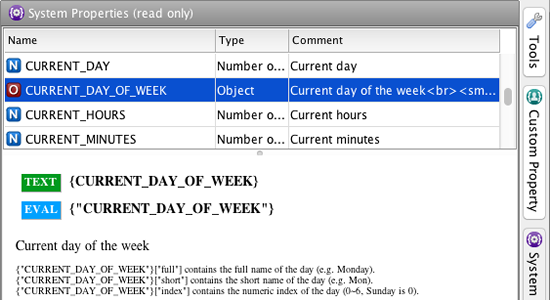
Since this new version, you can use the new {CURRENT_DAY_OF_WEEK} system property, which is an object type property and contains the current day of week in different display formats, as shown below:

day_of_week_property

What’s more, the existing {“CURRENT_MONTH”} system property gets changed to object type too, to include different display formats as well. The figure below shows the new content of this system property in the HTML5 simulation.

cur_month_property

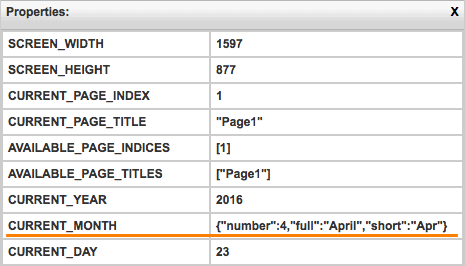
If you have used {“CURRENT_MONTH”} system property in your plot file, don’t worry and they will be automatically replaced by {“CURRENT_MONTH”}[“number”] once you load your plot file with the new version.

Gaussian Blur for Shadow

Shadow for element  is fully supported since version 4.0. By default the shadow is blurred with box blur algorithm to get better rendering speed. Now you can choose Gaussian blur algorithm if your machine is fast enough. The new option is available in the settings window, under the “Display” tab:

gaussian_blur_option

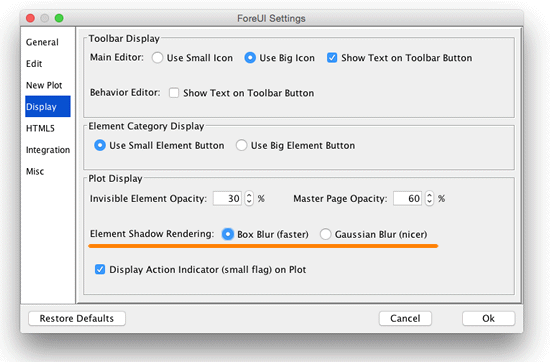
This option only affects the plot rendering in editing mode, and has nothing to do with the HTML5 simulation (the shadow in HTML5 simulation is rendered by the web browser).

How much nicer will the Gaussian Blur be? The figure below can give you an example. It is the Window element in “Ubuntu” UI theme, and the shadow gets rendered with box blur (left) and Gaussian blur (right).

blur_modesIt is no doubt that Gaussian blur is nicer, but please notice that Gaussian blur algorithm is quite CPU consuming. If your machine is not fast enough and your plot has many elements that has shadow, you may feel the slowing down of rendering. So use it wisely 🙂

ForeUI V4.1: Local Storage Element

ForeUI V4.1 is released now. This update introduces a new element named “Local Storage”, which is a representative of the “local storage” concept in HTML5. As you may have already known that, in ForeUI we have the “Html” and “Script” elements, which could be used to access the local storage in HTML5 directly. However, the new local storage element still bring you some benefits.

The Local Storage Element

The local storage element is just like the “Html”, “Css” and “Script” elements, they could be dragged and dropped into the editing area but they are not visible in the simulation.

LocalStorage_Element

One advantage of using this Local Storage element is that it provides a namespace for each instance of this element. So you can use this element like a database table, and different instances of this element can store values with the same key. In the “Manipulate Elements…” window, you can choose the “Set Local Storage Data” action and then specify the data as a key-value pair.

set_value

As you may already know that, the local storage in HTML5 can only store data as text string. The local storage element in ForeUI however, can store any data type supported by ForeUI, which are number, string, array and object. You don’t need to worry about how they get stored, ForeUI will take care of that for you.

The data stored in the local storage could then be retrieved as an element property (associative array type).

get_value

Communication between Simulations

This is the most interesting part. The data stored in local storage are persisted even the browser window gets closed, and they could be retrieved and used later. This could be used as an approach for communication between ForeUI simulations!

By using this local storage element, multiple ForeUI simulations can talk to each other. Of course you can achieve the same effect by directly using the local storage in HTML5, but ForeUI’s local storage element has its own namespace, and can easily help you to make sure the simulations can (or can not) share certain data.

The video below shows an example, there are two ForeUI plots and we launch two instances of simulation for each. Thanks to the local storage, these simulations are sharing the same data (x and y positions of the object). As you can see, the object locations are synchronized between all simulations.

local_sync_550

You may wonder how this is achieved. The magic is that both plots have a local storage element named “LocalStorage_GreenBall” (so they share the same namespace), and both plots are using the values with the same key (“x” and “y”) in this local storage element.

If you are interested in these example plots, they could be downloaded from the ForeUI store, or you can run the simulation directly from here and here.

It can be a Game Changer

It is cool that ForeUI simulations can communicate to each other, it could be useful to simulate the interaction between two or more applications. But it is not just that, this local storage element can actually change the whole game.

Have you ever tried to design a huge plot with ForeUI? When the plot becomes very big and complex (let’s say 100 pages with full of elements and behavior), it will be much harder to manage. The application will eat a lot of memory and becomes much slower. What’s more, loading the simulation for such a huge plot will be extremely slow, and sometimes your browser just lose response forever.

In this case, our suggestion is to split your design into multiple plots. But there is a problem followed, after splitting the plot, how can they share data between each other? There was no easy way to solve the problem before, but now we have one. By putting the data into the local storage, they could be accessed by multiple plots, which will work together and behave like just one plot.

split_plot

There is more. ForeUI has “iFrame” element at the very beginning, so it is possible to embed a simulation in another. Now we can make it even better, the simulation within iFrame can communicate with the outer simulation via local storage. That actually provides a new idea to design your plot. Some heavy-weight, reusable content could be created as a separated plot, and get embedded (maybe multiple times) in another plot’s simulation.

embed_plot

What do you think? With this new local storage element, you can design your plot in new ways, and implement much more exciting things in ForeUI!

ForeUI V4.0 is Released!

Dear ForeUI users, I am so happy to announce that ForeUI V4.0 is released now!

It has been almost three months since we released V4.0 beta. During the recent three months we received a lot of feedback from ForeUI users, and we worked on the documentation and bug fixings. The final V4.0 of course contains all the features in beta version, and we have blogged some of them before:

We will continue writing blog posts to introduce the new features in V4.0. Meanwhile this final V4.0 also has some bug fixed and includes some important enhancements and performance optimizations, and you can find a full list of changes here.

Outline View: Selecting Elements

In this version, we made a very useful enhancement, which eases the batch selection in outline view. Now clicking on element’s id label has different effect than clicking on the check-box on its left. If you click on element’s id, ForeUI assumes that you want to select this element only, and will clear the previous selection. If you click on the check-box, ForeUI assumes that you want to add/remove the element into/from the current selection, and other elements in the selection will be kept.

outline_selection

Behavior Editor: Disable Expression Diagnose

This small enhancement is reserved for advanced users. ForeUI diagnoses the expressions in the background, this is a very handy functionality. If the diagnose engine thinks an expression contains error, that line of behavior (and its descendants) will be excluded from the HTML5 simulation. This avoids a lot of chances to ruin to simulation with typo. However, what if the diagnose engine misjudges (because of bug or limitation)? This new option allows you to temporarily disable the diagnose engine for specific row of behavior, and make sure that behavior will be included in HTML5 simulation.

disable_diagnose
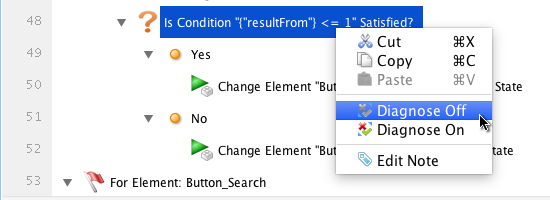
Please notice that, once you disable the diagnose, you are the only one who can make sure the expression gets right. If it is not, it could halt your HTM5 simulation. So this option is reserved for advanced users, and please try not to use it, or at least use it wisely, if you know what you are doing.

How to Install the New Version?

If you haven’t installed V4.0 beta before, you need to download the new installer here, and then install it, since the in-app update can not work for this major upgrade.

For users who has installed V4.0 beta before, it is possible to upgrade to V4.0 with the in-app update. However, downloading new installer and install again doesn’t hurt anything.

If you want to keep the older version, you can choose a different directory during the installation, otherwise the new version will overwrite the older version.

ForeUI V4.0 beta is out!

Dear ForeUI users, it has been a while since ForeUI’s last update, and today we finally bring you the good news: V4.0 beta is available now!

Screen Shot 2015-07-21 at 1.10.32 PM

Why BETA First?

Why beta version instead of an official release? Has this version get tested before releasing? The answer is YES, we already went through 15 iterations in alpha phase, and we are sure this beta version is usable (and much better than older versions).

The real reason that we have it as beta, is this version contains a lot of new features and enhancements, and we don’t have time to update the documents for them. Since today, we start to blog about the new features and enhancements in V4.0, and these content will also be updated to ForeUI’s documents. We are expecting to have the documents all up to date in about a month, and fix some bugs if we found any, then we release the V4.0 official version.

How to Upgrade?

If you run the older version of ForeUI, you will get the notification about the new version. However you will not be able to upgrade directly in the software, instead you will have to download the new version here, then install it.

Since this version, ForeUI supports Java 7 and higher. If you are using Mac OS X, the system will not complaint about the requirement of legacy Java run-time anymore.  If you download the installer for Windows, it contains the latest Java 8 run-time (both 32bit and 64bit) in package and will install the suitable one in your system.

If you already have a license key that younger than one year (purchased after 2014.7.21), you can use that license key directly on this version. Otherwise you can use the public beta tester license key below for testing (it will be expired in about a month):

NWE3NDI3OGM4MDU4M2RlMTdkZDQzMzdlOWNjM2NmYTRRBE1pNTRxEE1UUTBNREl3TWpNek53PT1g
GFZqUXVNQ0JDUlZSQklGUmxjM1JsY25NPWEITWpBd01BPT1QCFJtOXlaVlZKcBBNVFF6TnpRM05E
WTFNUT09YmY0YmEwZTBjZmJiODAwOGRiYzM3ZWE2NWVmMTQ0MjY=

Should I Use This Version?

If you are new to ForeUI, we encourage you to use this new version. Comparing to the older versions, it is much more powerful and can do better work in the major of cases.

If you know ForeUI well, and you are about to start a new project, we encourage you to use this new version. You will feel comfortable to work with it and find the new features and enhancements very helpful.

If you are working on a old project with ForeUI, we suggest you not to use this new version to work on it. Although we worked hard on the compatibility, there are still some angles that we have not considered. If you really want to try it, please make sure to backup your plot file (ForeUI will actually do it for you, when you load the old plot in new version). In the worse case, if your are unhappy with the new version, your work on the new version can not be ported back to the older version (means you lose the work on new version, if you still keep the plot backup).

Please notice that, since this version, ForeUI uses a newer format to store the plot data. For this reason, the plot file created with new version could not be loaded by the older versions. However, plot files created with older versions could be loaded by the newer version.

What’s New?

There are many new features and enhancements in this version. You can find a full list of them here: http://www.foreui.com/history/

The most obvious new feature is the two new UI themes: “Windows 8” and “Ubuntu”. The “Blueprint” UI theme has been added to the default UI theme list too. So now there is 8 UI themes available by default.

Screen Shot 2015-07-21 at 11.49.22 AM

In the coming few days, we will continue blogging about the new features in V4.0. Considering the leak of document of the new version, those blog posts may be the best materials to cover these new features and enhancements. So please stay tuned 🙂


ForeUI V3.90: Mark Element “Clickable” and Change Tooltip Dynamically

ForeUI V3.90 is released today! Besides the potential minor update (SP) versions on it, this version will be the last one before V4.0 (V4.0 will be released on early 2015).

Easily Mark Element “Clickable”

If you have ever used ForeUI to create a custom button, there is a big chance that you have ever handled “Mouse Over” and “Mouse Out” events and set the system cursor accordingly. If you are making a website prototype, you may want to make a lot of “clickable” areas on the page, handling those two mouse events on so many elements are really time consuming, and it makes the behavior list looks more complex.

Since V3.90, a new, simple option appears in the tools panel and allows you to mark element “clickable”. This option is available for almost all elements, except Button, Radio Button, CheckBox, Hyperlink and ComboBox, which are always clickable in simulation. Once an element is marked as “clickable”, it will change the shape of cursor that is hovering on it in the HTML5 simulation, thus acts like a clickable object on the page.

MarkClickable

Change Tooltip Dynamically

Tooltip is often used to prompt user about the functionality of button or other objects on the UI. If you just need a static tooltip, it could be specified in the “Tooltip” field in tools panel. But sometimes you may want to have a dynamic tooltip, which will change according to the context. This becomes possible since V3.90. A new “Set Tooltip” action is available in “Manipulate Elements…” window for all elements.

SetTooltip

The tooltip here can contain properties as well, so it is really a dynamic one. Setting an empty tooltip will remove tooltip from the element.

“Page Unloaded” Event

Almost everyone has used the “Page Loaded” event, which will be triggered when the target page is about to show. That is very useful when you want to initialize something before the page is shown. Now we have the “Page Unloaded” event, which will be triggered when you are about to leave the page. The handler for “Page Unloaded” event is the perfect place to clean up something before leaving.

PageUnloadedEvent

Collapse Behavior Tree Item

Now you can collapse behavior tree item. If you have a big branch in the behavior tree and you are not checking on it, collapsing it can save a lot of room and you can focus on the part you are reviewing.

collapsableTreeItem

Other Changes

You can find the complete list of changes made in this update here.