ForeUI is an easy-to-use UI prototyping tool, designed to create mockup / wireframe / prototypes for any application or website you have in mind.

All posts in Update

ForeUI V3.3 is Available Now

ForeUI V3.3 is just released today!  It has been a while since our last release, so thank you for the patience :-).  In this version we have made some internal alignments between ForeUI and the UI theme editor (as ForeUI plugin), so I guess you will see the brand new UI theme editor very soon.  Of course this new version contains many useful new features and enhancements, and fixed some annoying bugs.  Now let’s check them out.

Quick Define Behavior

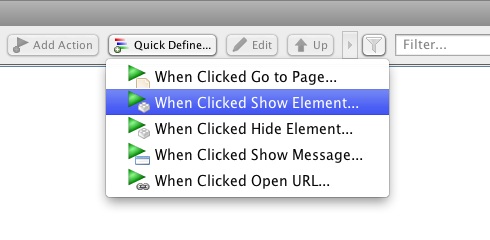
This new feature allows you to quickly define some simple behaviors by much easier way.  After selecting an element (e.g. a button), you will see the “Quick Define…” button in behavior editor is enabled, which will bring you a list of quick define wizards.  You will be asked to choose target page, select target element, input message to display or the URL to go, as long as ForeUI collects enough information, it will generate the behavior definition for you.  This can significantly simplify your work.
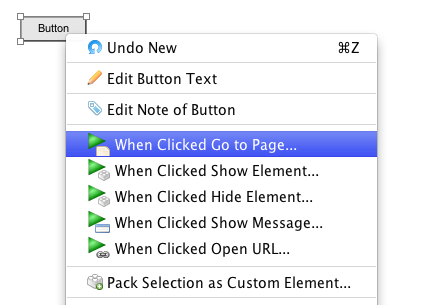
Quick Define BehaviorThe same wizard lists are also present in the context menu (right click to show it).

Quick Define Wizards

“Mini” Sub Style

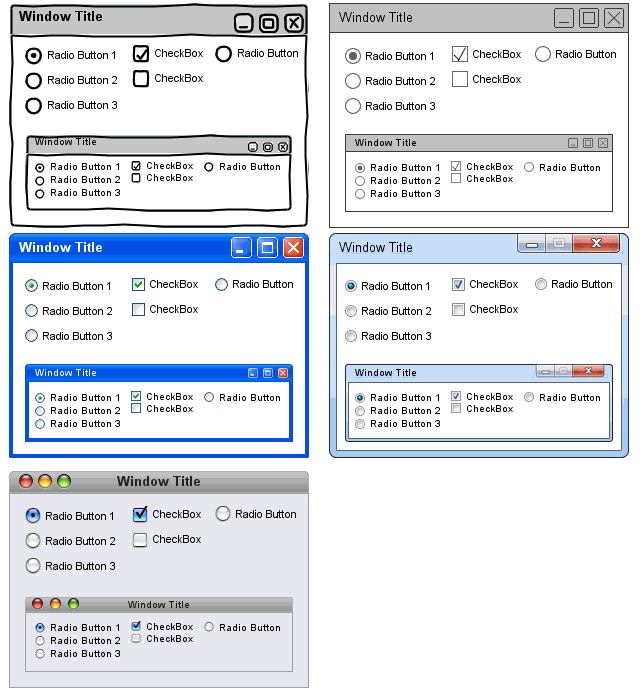
Since this version, all default UI themes support the “Mini” sub style for window, check box, radio button and radio button group. When you select one of these elements, you can find a drop-down list in the “Style” row in the tools panel, then you can choose between the default style and the “Mini” style.

Here is the comparison between default style and the “Mini” style, on different UI themes.

"Mini" Sub Style

In the future, with the UI theme editor, you will be able to create your own sub style, and easily apply it on your design (just like this “Mini” one).

Default Text Size

In previous versions you could specify the default font of the plot, but could not change the default text size.  Now you can!

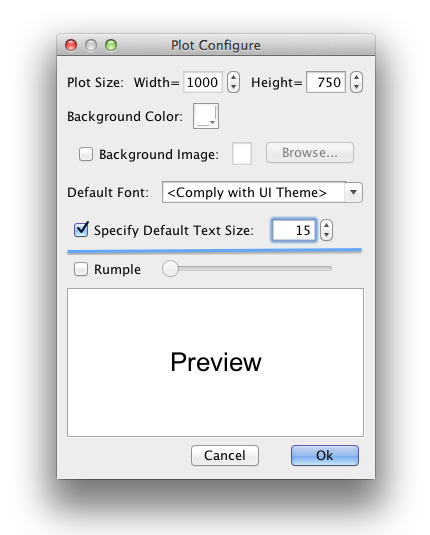
Open the plot configuration window via the “Plot Settings…” button, you will see a new option that allows you to do that.

Set default text size

Please notice that, the default text size will only be applied to the elements that you NEVER changed its font size.  If you have ever changed it, it will remember your modification and will not take the default text size.  Is there a way to reset it to use the default font?  Yes, you just need to choose the element you want to reset, and then click the “Reload Style” button in the “Style” row in tools panel, as shown below:

Reload Style

Better Behavior Diagnose

We received some complains from customers that their HTML5 simulations stopped working, and they didn’t know why.  After we investigated the issues, it turned out that in 90% cases, the problem is in the expression in behavior.  To be precise, it was the lack of quote marks for string value in the expression that caused the issue.  The string value without quote marks could kill the whole simulation since it brings Javascript syntax error.  It was a shame that ForeUI could not automatically detect this kind of error in behavior.  Now after a lot of work on this, we are glad that ForeUI can finally prevent customers from this kind of errors.

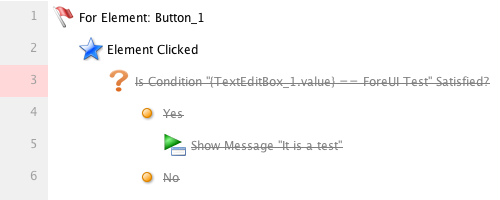
Any illegal value in the expression will be detected and make the behavior entity unavailable (displayed with strike-through), and it will not really be included in the simulation.  Thus the simulation is protected and you also have the information to find out which line is wrong in behavior.  The example below was a killer to the simulation (because the “ForeUI Test” string value does not have quote marks enclosed).  Now it is detected as an error and will not harm your simulation anymore, and you can fix it by knowing it is wrong.

Wrong Expression

Hide Text on Behavior Editor Toolbar Button

This is really a minor enhancement, but I’d like to mention it, otherwise you may not notice it is there 🙂

The idea is to allow hiding the text on the toolbar button, in behavior editor.  Thus you don’t need to scroll the toolbar if you are running a lower resolution.  The new option can be found in the settings window, under the display tab.

Hide Text on Toolbar

This option is on by default (show text on button).  If you turn it off.  You will have a much smaller toolbar in the behavior editor and the button text will be displayed as tool-tip instead.

Behavior Editor Toolbar

Other New Stuff

There are more new features, enhancements and bug fixings.  I am not going to introduce them one by one since they are quite easy to understand if you check them out in the update history page.

Enjoy using ForeUI and feel free to contact us 🙂
ForeUI V3.2: Element Tooltip, New Events and More

Element Tooltip

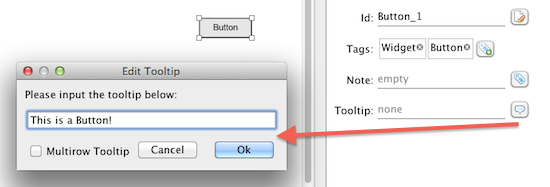
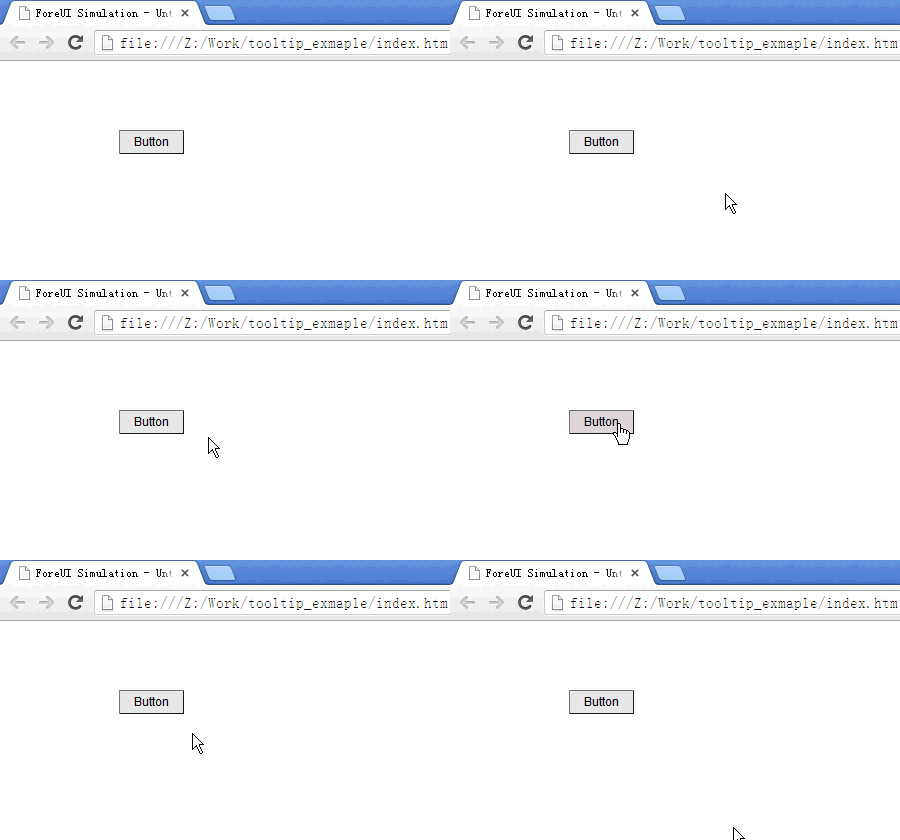
The newly released V3.2 introduced a very useful feature, which allows you to set the tooltip for any element.  It is a real tooltip: once the it is set, it will take effect automatically in the simulation.  You don’t need to simulate the tooltip by yourself anymore.

Here is how it will look like in the simulation:

If the tooltip is not set (empty), the element will not have tooltip in simulation, just like it did in the previous versions.

Selected/Unselected Event for Checkbox/Radio Button

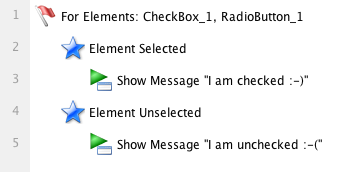
Since this version, you don’t need to check the checkbox/radio button state in a conditional branching anymore, just handle the “Element Selected” or “Element Unselected” events for checkbox/radio button, and you will get notified when the element selection state is changed.

New Action to Change Button Text

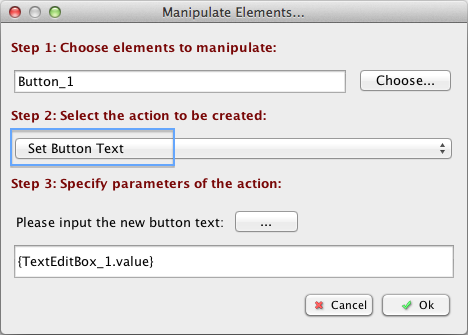
Now you can use the new “Set Button Text” action to change the text on the button.  That means you can have some dynamic button in your prototype.

Change Element Order

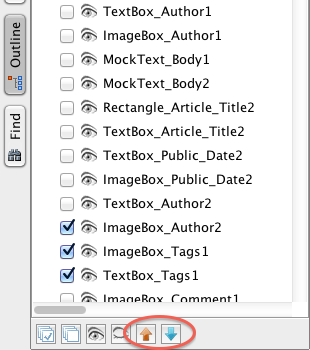
If you create some elements with the same Z value, the only thing that decides how to overlap them is the element order.  The element with smaller order index will be rendered earlier.  Now you can change element’s order in the outline view: just select the element and click the “move up” or “move down” button at the bottom, you will see the overlap order is changed accordingly.

Hotkey to Group/Ungroup Elements

Now you can press Ctrl+G to group the selected elements, and press Ctrl+Shift+G to ungroup the group you selected.  If you are using Mac OS X, the hotkey should be Command+G/Command+Shift+G.

There are More

There are more enhancements in this version.  Please read the update history for more details.

ForeUI V3.10 is Released!

ForeUI V3.10 is released on 5th December, 2012.  We have made a lot of optimization in this version and now it becomes much faster and smoother.  What’s more, there are some exciting new features and enhancements.

Import Plot

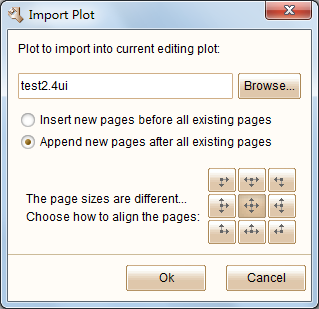
This feature is designed for team collaboration.  Your team members may work on different parts of the design as different plot files.  Finally you may wish to merge all plots together, and here is the way to go.  You can use the “Import Plot” feature to Import another plot into the current editing plot.  You can decide where to place the new pages (before or after current existing pages), and you can specify how to align the new pages with the old ones (if they have different size).

This feature is available in the “File” menu.  The “Import Plot…” item will be enabled if you have at least one plot opened for editing.

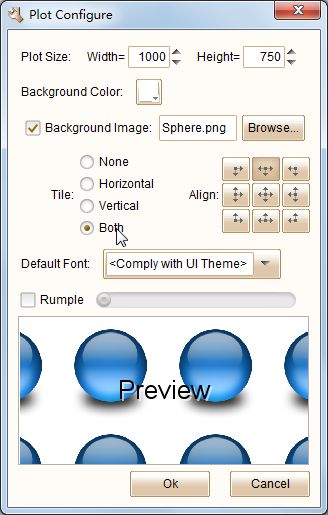
Background Image

From this version, you can specify the background image for the entire plot.  You will be able to find some new options after clicking the “Plot Settings…” button on bottom right corner.  The background image can be tiled horizontally, vertically or in both directions.  You can also configure how to align the background image with the page.

Compatible with Mountain Lion

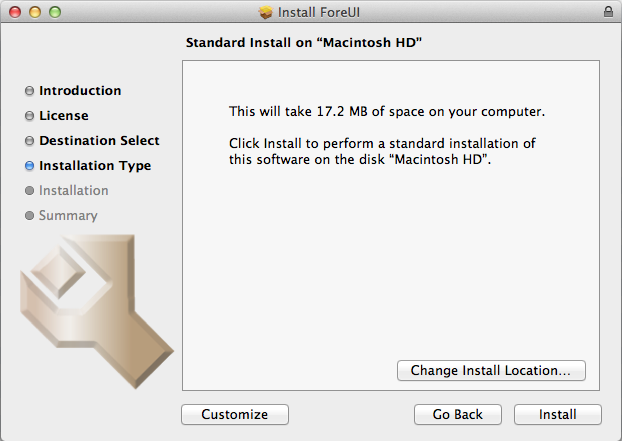
We have a blog post about the issue when running ForeUI in Mountain Lion (Mac OS X 10.8).  Now the problem is solved.  ForeUI application is signed with Apple Developer ID certificate now, and you will get smooth experience when installing ForeUI into your Mountain Lion system.

What’s more, we have fixed some minor issues and made some improvements for Mac OS system.  We even created a new installer for it:

Input Element Id in Chooser

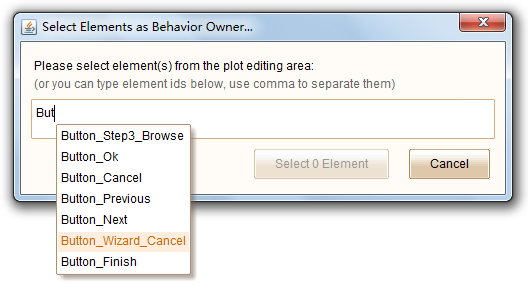
In previous versions.  When the element chooser is shown up, you will need to select element in the plot editing area.  If the target element is covered by other elements, or it is in another page, it will take you some time to find it out.  Now you have another choice: you can directly input the element’s id in the chooser.  You don’t have to remember all the IDs, just start typing the prefix of the id and you will see all candidates are listed, which is fancy 🙂

When the content assistance pops up, you can use the UP and DOWN keys on keyboard to choose the one you want.  Of course you can use mouse to select the element from the list.

Other Changes

There are more content in this update.  You can check out this page to see other new features, enhancements and fixed bugs in this release.

ForeUI V3.0 Official Released!

The official release of ForeUI V3.0 is delivered today.  Comparing with the previous releases, this version is more focus on the reliability and usability.  However, there is still an exciting new feature in this version, which is called “integration task” that can easily integrate ForeUI with other tools.

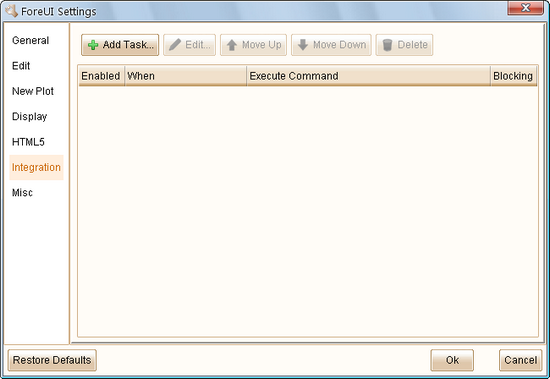
You may already know that you can invoke ForeUI via command line to generate image or HTML5 simulation.  However, have you considered to use other tools to process the file(s) generated by ForeUI?  The integration task is designed for that purpose.  In the settings window, you will see a new tab named “Integration”, which allows you to manage the integration tasks.

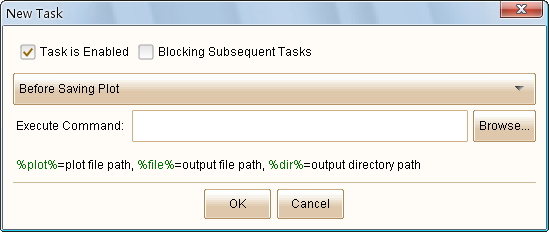
You can click the “Add Task…” button to add a new integration task.  Here you can specify the parameters for the task.

If you unselect the “Task is Enabled” option, the new task will be created but not take effect immediately, until you enable it later.

If you select the “Blocking Subsequent Tasks” option, the new task will block the workflow until the command is finished.  This is useful when you want to execute a serial of tasks in order.

You will need to specify the condition that trigger the task.  So far ForeUI supports these conditions:

  • Before Saving Plot
  • After Saving Plot
  • Before Export HTML5
  • After Export HTML5

You can input or browse the command to be executed, and you can use the variables below in the command:

  • %plot%: the file path of the current editing plot.
  • %file%: the path of the output file.  For Before/After Saving Plot task, it will be the path of plot file to save; For Before/After Export HTML5 task, it will be the path of generated HTML file.
  • %dir%: the path of the output directory.  For Before/After Saving Plot task, it will be the path of directory to save plot file; For Before/After Export HTML5 task, it will be the path of directory that store the generated HTML files.

By making use of the integration task, you can invoke other tools to process the file generated by ForeUI.

Example:  Auto Commit Plot File to SVN Repository

Some customers have asked for the version control feature.  Now we can have it by integrating ForeUI with SVN.  If you are not familiar with the usage of SVN, you can find some tutorials via google.

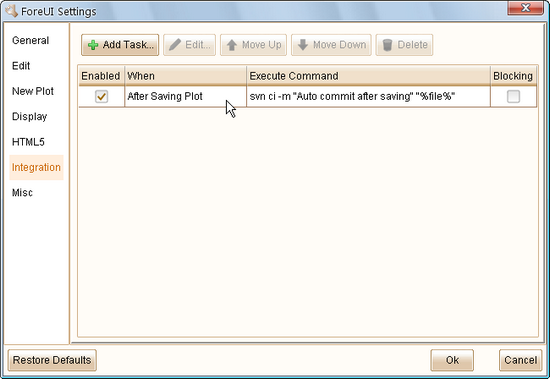
Assume that you want to commit the plot file to SVN repository everytime after you save the plot.  First you should add your plot file into a project, and checkout your project to a local directory.  Then please open the plot with ForeUI and go to the “Integration” tab in settings window.  You can create an integration task like this:

That’s all, every time you save your plot, it will be committed to the SVN repository, so you will never lose your work, theoretically 🙂

If the plot file is not added into your SVN project, the command above will do nothing.

Remarks: the integration task feature is available for registered user only.

Other Enhancements and Bug Fixings:

Please check out this page to see the complete list of enhancements and fixed bugs in this version.

ForeUI V3.0 RC Released!

2

ForeUI 3.0 RC version is just released.  As the last version before V3.0 official release, this version tend to be stable and offer much better experience.  We don’t plan to add new feature in the official release of 3.0, instead we will include the completed document and have some bugs fixed.

We have made so many improvements in this version that I could not introduce them one by one.  A full list of new features, enhancements and bug fixings can be found here.  In this blog post, I would like to show you the most interesting part of this update.

ForeUI Store

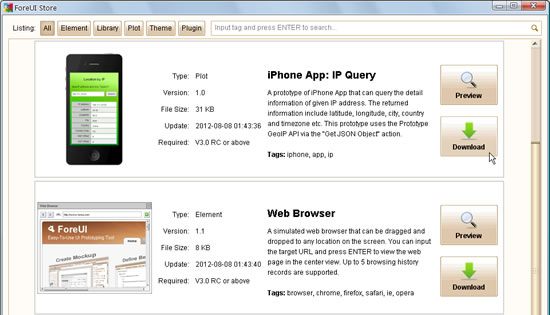
From this version, ForeUI integrates with its new online resource store.  You can download new element, library or plot file from store window, or from the store web site.  You will be able to download new UI theme and ForeUI plugins from the same site in the future.

Clicking the category buttons on top can filter the items to be listed.  You can also search the item by tag via the search box on top right corner.  If you click the “Preview” button, the HTML 5 simulation of the item will be launched in your web browser, and you can see how it works.  Clicking on the “Download” button will download the item and deploy it (if needed).

The store is just online and there is not so much resource inside yet.  We will frequently add new resources into the store site.

Drag and Drop in Outline View

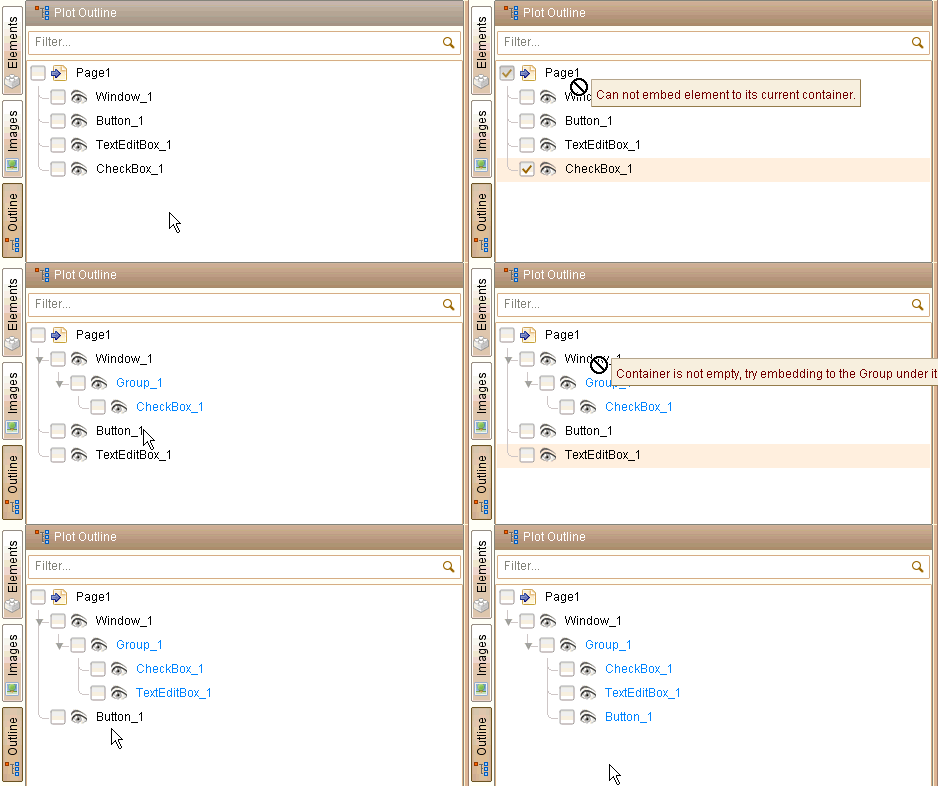
The outline view is significantly improved by supporting drag and drop elements directly.  This is an easy way to embed element into container, or move embedded element from one container to another.

When you drag an element and try to drop it into a container, the tool-tip will tell you if it is allowed.  So you will know what you can do and what you can’t, also you will know why.  This feature is extremely useful when you want to manage a lot of overlapped elements.

Other New Stuffs

There are many other new things in this version.  Don’t be surprised if you find something different than they used to be.  Ususally they are changed in a better way, but if you think they are not, please feel free to tell us.

If you are interested in what we exactly did in this version, please check out the update history page.